307 Breaknck

Ihr habt kein Problem mit eurem Peugeot? Habt aber trotzdem was zum Löwen zu sagen? Dann seid ihr hier genau richtig.
Benutzeravatar
cybernck
Kanaldeckelumfahrer
Beiträge: 125
Registriert: Mi 08.11.06 13:22
Land: Deutschland
Wohnort: Banja Luka, Bosnia
Kontaktdaten:

Re: 307 Breaknck

Beitrag von cybernck » Mo 29.08.11 22:47

Time to move on to happier updates, I think! Haha.


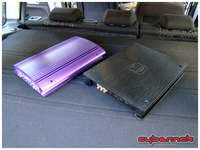
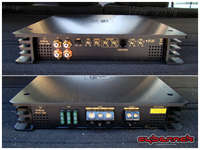
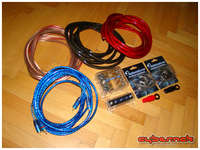
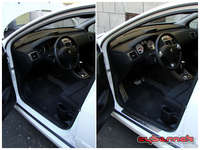
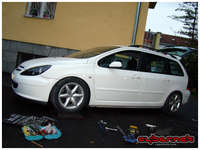
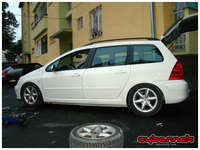
It's time to revisit and finally complete the audio system, starting with a messy job of properly
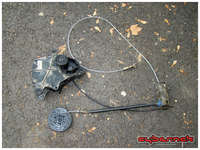
installing the front speakers at long last! Typical French - holes everywhere in the door, except
where I need one to be.

Bild

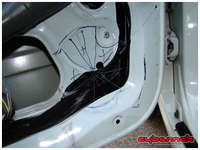
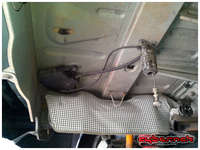
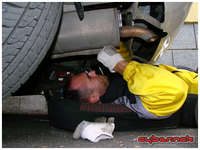
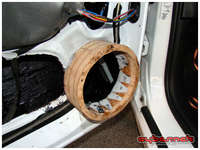
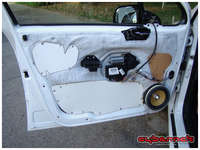
Inner skin was cut-out and prepared to take a custom MDF speaker pod. With the pod in place
and firmly attached to the door's inner skin, we treated outer skins, pods and door cards treated
with a couple of coats of bitumen, for at least some vibration damping.

Bild

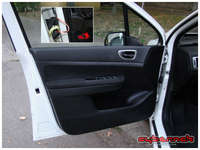
And finally, speaker installed and all the holes sealed. What an unbelievable improvement of
my audio system, quite possibly the biggest single upgrade I've done so far!

Bild

Door cards back on, though I did have to remove the lower hole cover I had made, so I will
have to revisit it later and also add LOADS of Dynamat or such material everywhere in the doors.

Bild


The next update will be all about audio as well :).


Photos here: http://photos.cybernck.com/307breaknck?page=10

Benutzeravatar
Quicksilver307
Lenkradbeißer
Beiträge: 286
Registriert: Sa 25.09.04 16:13
Land: Deutschland
Wohnort: Thüringen

Re: 307 Breaknck

Beitrag von Quicksilver307 » Di 30.08.11 21:38

Good work... :daumenhoch:
Bild Bild Bild

Benutzeravatar
cybernck
Kanaldeckelumfahrer
Beiträge: 125
Registriert: Mi 08.11.06 13:22
Land: Deutschland
Wohnort: Banja Luka, Bosnia
Kontaktdaten:

Re: 307 Breaknck

Beitrag von cybernck » Sa 10.09.11 02:01

Time to finally complete my envisaged audio system!

Bild

Out with the old 4-channel amplifier (Magnat Rave 440, on the left, good little amp), in with
the new one (Focal FP 4.75, on the right). Specs: 4 x 75W @ 4 ohms, 4 x 100W @ 2 ohms,
2 x 200W @ 4 ohms. Full active crossover and an output for a second amp.

Bild

Previous configuration was 2+1 ch, but since I'm going to run front Focal 165K2P speakers
on Focal FP 4.75 in bridged mode with low gain, it's accompanied by it's monoblock brother,
Focal FP 1.800 (with remote gain control) for the subwoofer.

Bild

Specs: 1 x 400W @ 4 ohms, 1 x 600W @ 2 ohms, 1 x 800W @ 1 ohm. Focal 33KX beast
will be unleashed :-).

Bild

Additional wiring was required for the additional amp.

With the front speakers properly installed and with the addition of new amplifiers, I am very
happy with my audio system now! I keep hearing details I previously haven't, in the same
tracks and songs. Next mods will be sound deadening and a better headunit.

As you can see, the 18" RS GT wheels are back on the car as well :).


Photos here: http://photos.cybernck.com/307breaknck?page=10

Benutzeravatar
cybernck
Kanaldeckelumfahrer
Beiträge: 125
Registriert: Mi 08.11.06 13:22
Land: Deutschland
Wohnort: Banja Luka, Bosnia
Kontaktdaten:

Re: 307 Breaknck

Beitrag von cybernck » Mi 05.10.11 00:28

With the audio install finished at long last, it was time to turn my attention to exterior and
fit parts I've had laying around for quite some time, but the first job was to get the bodywork
cleaner and shinier by a professional polisher.

Bild

Then came a long awaited solution to a "radio controlled car" antenna, in form of a short
OE antenna, part number 6561.QQ, found on various models (607, 807 etc). Fits nicely
and radio reception seems fine, but I don't listen to radio at all, so it doesn't matter to
me either way :).

Bild

Someone had stolen my rear wiper blade a long time ago and the wiper arm (6429.T8)
had a lot of play in it, so I bought both parts new. The wiper arm required a bit of persuasion
from an angle grinder to come off though.

Bild

As I decided to update the tails lamps to Phase 2, I went for Phase 2 side indicators as well.
6325.G3 - 206 Phase 2 side indicators (x2). Exactly the same as 307 items (6325.G4) but at
half a price. Go figure. Not too visible in daytime, as the bulb is hidden.

Bild

Phase 2 tail lamps! Compared to Phase 1 lights, they look much brighter, fresher and more red,
thought with a bit of a "China" look and feel to them. They fit the car straight on, but you need
additional two 5W bulbs, compared to Phase 1 lights.

Bild

Exterior mods completed. Not much of a photo, but shows how shiny the car is.

Bild

That's it for the bodywork mods, for the time being anyway.


Photos here: http://photos.cybernck.com/307breaknck?page=11

Benutzeravatar
cybernck
Kanaldeckelumfahrer
Beiträge: 125
Registriert: Mi 08.11.06 13:22
Land: Deutschland
Wohnort: Banja Luka, Bosnia
Kontaktdaten:

Re: 307 Breaknck

Beitrag von cybernck » Sa 21.01.12 21:18

Here's a small but sweet update :).

The almighty 6554F4 ESP OFF switch :-). Don't know what the price is, as I got it
as a part of a 307 CC center console.

Bild

I really can't understand the logic of having all the wiring installed, as well as the feature
implemented, but deciding to blank it off instead of fitting a switch! :-/ The new button
fits straight in.

Bild

Et voila! I can now turn off the ESP and traction control off, which is required sometimes
when the ECU can't figure out what's the best thing to do.


Full-size photos here: http://photos.cybernck.com/307breaknck?page=11

Benutzeravatar
cybernck
Kanaldeckelumfahrer
Beiträge: 125
Registriert: Mi 08.11.06 13:22
Land: Deutschland
Wohnort: Banja Luka, Bosnia
Kontaktdaten:

Re: 307 Breaknck

Beitrag von cybernck » Mi 10.10.12 00:02

With my cycle racing season finally over, I'm going ahead with my little project, finally mounting
some parts I've had laying around for nearly a couple of years now. Here you can see 307 Automatic
alloy pedal set I got off eBay, a genuine 307 CC leather steering wheel form a UK breaker's yard
and finally, some genuine 307 alloy front sill plates, part number 9623.76, also an eBay special.

Bild Bild Bild


Mounting the brake pedal using supplied allen screws is straightforward after removal of the original
rubber pedal cover, as the holes for the screws are already there. However, throttle pedal was a bit
of a challenge and had to be removed because of the construction of the pedal.

Bild

It would have been nearly impossible to position it right while at the same time manage to bolt it up,
so we riveted it on instead. The removable leg rest offers easy mounting of the leg rest pedal.
We opted for riveting on this one as well.

Bild


Next up, the steering wheel. After disconnecting the battery, airbag is easily removed using two
flat-headed screwdrivers inserted in the holes at the back of the steering wheel. A word of warning -
do not fully unscrew and remove the main torx bolt until you've managed to release the steering wheel
from the steering crown, as you'll probably end up tearing off all the airbag connectors!

Bild

Fitting the other wheel is a reverse of the removal. And there are no spare bolts left, for a change! :-)

Bild


And finally, fitting the sill plates is super-easy and quick, as it comes with a self-adhesive tape
on the back. You just need to lift the plastic cover and rubber seal off of the sill seam, clean up
and degrease the surface, test-fit the sill plate and and then stick it on. Job done!

Bild


I will continue with this "307 CC interior upgrade pack" in the next update too :).


Full size photos available here: http://photos.cybernck.com/307breaknck?page=12

Benutzeravatar
cybernck
Kanaldeckelumfahrer
Beiträge: 125
Registriert: Mi 08.11.06 13:22
Land: Deutschland
Wohnort: Banja Luka, Bosnia
Kontaktdaten:

Re: 307 Breaknck

Beitrag von cybernck » Fr 26.10.12 14:44

Next up - 307 CC white clocks with chrome rings, red needles and radial writing. Got them from the UK
(eBay once again), so they're in mph but they also have a km/h scale, in small print.

Bild

It was not a simple plug'n'play affair though, because I needed to keep my circuit board. Therefore,
armed with a Torx bit, I started disassembling them to bits. I even had to go the lengths of cutting out
and swapping the center "display" part, so the warning lights would remain correct.

Bild Bild Bild

Et voila! Clocks finished, fitted back into the car and looking classy, in my opinion.

Bild


And finally - a "before and after" shot, to sum it all up. The new details really smarten up the interior
and the steering wheel is much nicer to use.

Bild

As far as interior mods are concerned, that's it for now, but I've definitely got another thing or two planned ;-).


Full size photos available here: http://photos.cybernck.com/307breaknck?page=12

Benutzeravatar
madmadix
Rettungswagenüberholer
Beiträge: 4430
Registriert: Di 06.09.05 21:18
Postleitzahl: 35114
Land: Deutschland
Wohnort: Haina (Kloster)

Re: 307 Breaknck

Beitrag von madmadix » Fr 26.10.12 20:35

haj,

thumbs up! :daumenhoch:

good work! :)

mfg
Peter

Benutzeravatar
cybernck
Kanaldeckelumfahrer
Beiträge: 125
Registriert: Mi 08.11.06 13:22
Land: Deutschland
Wohnort: Banja Luka, Bosnia
Kontaktdaten:

Re: 307 Breaknck

Beitrag von cybernck » Mo 05.11.12 19:53

My exhaust had developed a booming noise and eventually the pipe going into the backbox broke off,
so I took it over to an exhaust service place for a fix.

Bild


While at it, I took an opportunity to remove the broken spare wheel mechanism to finally check
what's going on with it. The problem was quite obvious and it's a common one on 307 Break & SW cars.
The solution was simple - new cable made based on the original one - much cheaper than a complete
new mechanism from Peugeot.

Bild Bild Bild

Fitting it back on isn't such a simple job when you're doing it in a car park but the spare wheel
will finally be gone from the boot and back under the car!

Bild Bild Bild


Meanwhile, my expensive Varta battery had died (just outside the warranty period - typical).
I purchased a cheaper 60Ah one this time, that seems to do the job just as well.

Bild


Full size photos available here: http://photos.cybernck.com/307breaknck?page=13

Benutzeravatar
cybernck
Kanaldeckelumfahrer
Beiträge: 125
Registriert: Mi 08.11.06 13:22
Land: Deutschland
Wohnort: Banja Luka, Bosnia
Kontaktdaten:

Re: 307 Breaknck

Beitrag von cybernck » Mi 26.12.12 23:27

Just a quick update.


I've had this idea for winter wheels setup for a while and I've finally got it done now.
406 Coupe V6 Starfish wheels, 7x16" ET12. I don't think I've ever seen another 307
with them on.

Bild Bild

Nice and wide, they fill the arches just like the later version Coupe wheels (Hoggar)
I've had on the car in the past, but visually suit the 307 better. All I now need is
a V6 engine, haha.


Full size photos available here: http://photos.cybernck.com/307breaknck?page=13

Antworten